<!DOCTYPE html PUBLIC "-//W3C//DTD HTML 4.01 Transitional//EN" 'http://www.w3.org/TR/html4/loose.dtd"'>
<html><head><meta http-equiv="Content-Type" content="text/html; charset=UTF-8"><title>Creating an Application Package</title><link rel="stylesheet" type="text/css" href="openacs.css"><meta name="generator" content="DocBook XSL Stylesheets Vsnapshot"><link rel="home" href="index.html" title="OpenACS Core Documentation"><link rel="up" href="tutorial.html" title="Chapter 9. Development Tutorial"><link rel="previous" href="tutorial.html" title="Chapter 9. Development Tutorial"><link rel="next" href="tutorial-database.html" title="Setting Up Database Objects"></head><body bgcolor="white" text="black" link="#0000FF" vlink="#840084" alink="#0000FF"><div class="navheader"><a href="http://openacs.org"><img src="/doc/images/alex.jpg" style="border:0" alt="Alex logo"></a><table width="100%" summary="Navigation header" border="0"><tr><td width="20%" align="left"><a accesskey="p" href="tutorial.html">Prev</a> </td><th width="60%" align="center">Chapter 9. Development Tutorial</th><td width="20%" align="right"> <a accesskey="n" href="tutorial-database.html">Next</a></td></tr></table><hr></div><div class="sect1"><div class="titlepage"><div><div><h2 class="title" style="clear: both"><a name="tutorial-newpackage"></a>Creating an Application Package</h2></div></div></div><div class="authorblurb"><p>by <a class="ulink" href="mailto:joel@aufrecht.org" target="_top">Joel Aufrecht</a></p>
          OpenACS docs are written by the named authors, and may be edited
          by OpenACS documentation staff.
        </div><div class="sect2"><div class="titlepage"><div><div><h3 class="title"><a name="tutorial-picture"></a>The intended page map</h3></div></div></div><div class="mediaobject"><img src="images/openacs-best-practice.png"></div></div><div class="sect2"><div class="titlepage"><div><div><h3 class="title"><a name="id1361"></a>Overview</h3></div></div></div><p>To start developing new code in OpenACS, we build a new package. A package 
      is a discrete collection of web pages, Tcl code, and database tables and procedures.
      A package with user interface is called an <span class="strong"><strong>application</strong></span>; 
      a package which provides functions to other packages and has no direct interface, a
      <span class="strong"><strong>service</strong></span>.  A package can be installed, upgraded, and 
      removed.  It communicates with other packages through an API.  This chapter walks you through 
      the minimum steps to create a useful package, including writing documentation, setting up 
      database tables and procedures, writing web pages, debugging, and automatic regression testing.
      </p><p>
        This tutorial uses the content repository package.  This
        radically simplifies the database work, but forces us to work
        around the content repository's limitations, including an
        incomplete Tcl API.  So the tutorial is messier than we'd like
        right now.  Code that is temporary hackage is clearly marked.
      </p><p>
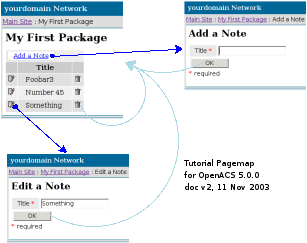
In this tutorial, we will make an application package for
    displaying a list of text notes.
</p></div><div class="sect2"><div class="titlepage"><div><div><h3 class="title"><a name="id1362"></a>Before you begin</h3></div></div></div><p>You will need:</p><div class="itemizedlist"><ul class="itemizedlist" style="list-style-type: disc; "><li class="listitem"><p>A computer with a working installation of
	  OpenACS.  If you don't have this, see <a class="xref" href="install-overview.html" title="Chapter 2. Installation Overview">Chapter 2, <i>Installation Overview</i></a>.
	  </p></li><li class="listitem"><p>Example files, which are included in the
standard OpenACS 5.9.0 distribution.
	  </p></li></ul></div><div class="figure"><a name="id1407"></a><p class="title"><b>Figure 9.1. Assumptions in this section</b></p><div class="figure-contents"><div class="informaltable"><table class="informaltable" cellspacing="0" border="1"><colgroup><col><col></colgroup><tbody><tr><td>Fully qualified domain name of your server</td><td><span class="replaceable"><span class="replaceable">yourserver.test</span></span></td></tr><tr><td>URL of your server</td><td><span class="replaceable"><span class="replaceable">http://yourserver.test:8000</span></span></td></tr><tr><td>Name of development account</td><td><span class="replaceable"><span class="replaceable">$OPENACS_SERVICE_NAME</span></span></td></tr><tr><td>New Package key</td><td><span class="replaceable"><span class="replaceable">myfirstpackage</span></span></td></tr></tbody></table></div></div></div><br class="figure-break"></div><div class="sect2"><div class="titlepage"><div><div><h3 class="title"><a name="id1363"></a>Use the APM to initialize a new package</h3></div></div></div><p>We use the <a class="ulink" href="packages.html" target="_top">ACS Package Manager</a> (APM) to add, remove, and
    upgrade packages.  It handles package meta-data, such as lists of
    files that belong in the package.  Each package is uniquely
    identified by a package key.  To start developing a new
    package, use the APM to create an empty package with our new
    package key, <span class="replaceable"><span class="replaceable">myfirstpackage</span></span>.  This will create
    the initial directories, meta-information files, and database
    entries for a new package.  (<a class="ulink" href="apm-requirements.html" target="_top">More info on APM</a>)
</p><div class="orderedlist"><ol class="orderedlist" type="1"><li class="listitem"><p>Browse to
        <code class="computeroutput">http://<span class="replaceable"><span class="replaceable">yourserver:8000</span></span><a class="ulink" href="/acs-admin/apm" target="_top">/acs-admin/apm</a></code>.
</p></li><li class="listitem"><p>Click <code class="computeroutput">Create a New Package</code>.</p><p>Fill in the fields listed below.   <span class="strong"><strong>Ignore the rest (and leave the check boxes alone).</strong></span>
        (Some will change automatically.  Don't mess with those.)
</p><div class="itemizedlist"><ul class="itemizedlist" style="list-style-type: disc; "><li class="listitem"><p>
              <code class="computeroutput">Package Key</code>:
              <strong class="userinput"><code>myfirstpackage</code></strong></p></li><li class="listitem"><p>
              <code class="computeroutput">Package Name</code>:
              <strong class="userinput"><code>My First Package</code></strong>
            </p></li><li class="listitem"><p>
              <code class="computeroutput">Package Plural</code>:
              <strong class="userinput"><code>My First Package</code></strong></p></li><li class="listitem"><p>
              <code class="computeroutput">Package Type</code>:
              <strong class="userinput"><code>Application</code></strong>
            </p></li><li class="listitem"><p>	  
              <code class="computeroutput">Initial Version</code>:
              <strong class="userinput"><code>0.1d</code></strong>
            </p></li><li class="listitem"><p><code class="computeroutput">Summary</code>:
              <strong class="userinput"><code>This is my first package.</code></strong>
            </p></li></ul></div><p>At the bottom, click
        <code class="computeroutput"><span class="guibutton"><span class="guibutton">Create Package</span></span></code>.
        </p></li></ol></div><p>This creates a package rooted at
          <code class="computeroutput">/var/lib/aolserver/<span class="replaceable"><span class="replaceable">$OPENACS_SERVICE_NAME</span></span>/packages/<span class="replaceable"><span class="replaceable">myfirstpackage</span></span></code>.
          This is the "home directory" of our new package, and all
          files in the package will be within this directory. <a class="ulink" href="packages.html" target="_top">More on the structure of
          packages</a>). </p></div><div class="sect2"><div class="titlepage"><div><div><h3 class="title"><a name="id1364"></a>Add an Application Instance to the Server</h3></div></div></div><p>In order to see your work in progress, you must create a
      map between the URL space of incoming requests and the package application instance.
      You do this by adding the application in the main site administration).  This
      creates a link between the incoming URL requests and an
      <span class="emphasis"><em>instance</em></span> of the application.  (<a class="ulink" href="rp-design.html" target="_top">More on applications and nodes</a>)</p><p>You can have instances of a package on one site, each with a
      different URL and different permissions, all sharing the same
      code and tables.  This requires that a package be developed
      <span class="emphasis"><em>package-aware</em></span>.  You'll see how to do that
      in this tutorial.</p><div class="orderedlist"><ol class="orderedlist" type="1"><li class="listitem"><p>Browse to
<code class="computeroutput"><span class="replaceable"><span class="replaceable">http://yourserver.test:8000</span></span><a class="ulink" href="/admin/applications/application-add" target="_top">/admin/applications/application-add/</a></code>.</p></li><li class="listitem"><p>Choose "My First Package" from the list and click OK (the other fields are optional).</p></li></ol></div><p>By mounting the package, we've caused all requests to
      <code class="computeroutput">http://yourserver.test:8000/myfirstpackage</code>
      to be satisfied from the files at <code class="computeroutput">/var/lib/aolserver/$OPENACS_SERVICE_NAME/packages/myfirstpackage/www</code>.</p></div><div class="sect2"><div class="titlepage"><div><div><h3 class="title"><a name="id1365"></a>Quick start</h3></div></div></div><p>The remainder of the tutorial walks you through each file one at a time as you create the package.  You can skip all this, and get a working package, by doing the following:</p><pre class="screen">cd /var/lib/aolserver/<span class="replaceable"><span class="replaceable">$OPENACS_SERVICE_NAME</span></span>/packages/acs-core-docs/www/files/tutorial
psql <span class="replaceable"><span class="replaceable">$OPENACS_SERVICE_NAME</span></span> -f myfirstpackage-create.sql
cp note-edit.* note-delete.tcl index.* ../../../../myfirstpackage/www/
mkdir ../../../../myfirstpackage/lib
cp note-list.* ../../../../myfirstpackage/lib/
cp myfirstpackage-*sql ../../../../myfirstpackage/sql/postgresql/
cp myfirstpackage-procs.tcl ../../../../myfirstpackage/tcl/test/
cp note-procs.tcl ../../../../myfirstpackage/tcl/</pre><p>After restarting the server, the tutorial application will be installed and working at the url you selected in the previous step.</p></div></div><div class="navfooter"><hr><table width="100%" summary="Navigation footer"><tr><td width="40%" align="left"><a accesskey="p" href="tutorial.html">Prev</a> </td><td width="20%" align="center"><a accesskey="h" href="index.html">Home</a></td><td width="40%" align="right"> <a accesskey="n" href="tutorial-database.html">Next</a></td></tr><tr><td width="40%" align="left">Chapter 9. Development Tutorial </td><td width="20%" align="center"><a accesskey="u" href="tutorial.html">Up</a></td><td width="40%" align="right"> Setting Up Database Objects</td></tr></table><hr><address><a href="mailto:docs@openacs.org">docs@openacs.org</a></address></div><a name="comments"></a></body></html>